- Navigate to the START button and select MY COMPUTER (Windows XP) or COMPUTER (Windows Vista).
- Select the drive where you installed Unfair Advantage.
- Go to the folder \ua\archives.
- Backup the file PORTFILE.ADM to your desktop.
You could also make a backup of the files portfile.b1 …, portfile.d1 …, portfile.m1 …
These files are backup files which Unfaire Advantage creates.
(Right click the mouse button, and select COPY | go to your desktop | right click the mouse button again, and select PASTE) - Uninstall your current Unfair Advantage version via Control Panel.
(START | CONTROL PANEL | ADD OR REMOVE PROGRAMS (Windows XP) or PROGRAM FEATURES (Windows Vista) - Delete the \ua folder manually.
- Install the new version of Unfair Advantage.
- Do a daily download.
- Copy the file PORTFILE.ADM back to the folder \ua\archives.
Support Blog
The support blog is a guide for default set ups, fixes and recommendations for Unfair Advantage and other Trading Programs.
How to move a portfolio from one version to another?
How to restore a PORTFILE.ADM from a backup file?
Steps if you are able to launch Unfair Advantage:
- Double click the LAUNCH UA icon on your desktop.
- Click PORTFOLIO along the top.
- Select RESTORE PORTFOLIO.
- Choose the most recent date with the biggest file size, and click the OK button.
Steps if you are NOT able to launch Unfair Advantage:
- Navigate to the START button and select MY COMPUTER (Windows XP) or COMPUTER (Windows Vista).
- Select the hard drive where you installed Unfair Advantage.
- Go to the folder \ua\archives.
- Click the VIEWS icon in the Windows Explorer and choose DETAILS.
Navigate to the SIZE column and click it until you get the highest to the lowest file size.
Look for the PORTFILE.ADM file.
Choose a backup file (i.e portfile.r1 …, portfile.b1 …, portfile.d1 …, portfile.m1 …) which compares to the size of the PORTFILE.ADM file.
- Delete the PORTFILE.ADM file and rename the backup file (i.e portfile.r1) to PORTFILE.ADM.
- Go back to your desktop and double click LANUCH UA.
How to refresh the database history?
Issue:
- gap in the data
- history missing
- the chart doesn’t look right
- data missing
Versions affected:
- all UA versions
Solution for Futures
- Click LAUNCH UA on your desktop,
- select DATABASE from the main menu,
- click REFRESH (DATABASE) PRICE HISTORY,
- hit the first tab SELECT MARKETS,
- type in
and hit the DOWNLOAD button. - This process may take a few minutes.
Solution for Stocks
- Click LAUNCH UA on your desktop,
- select DATABASE from the main menu,
- click REFRESH (DATABASE) PRICE HISTORY,
- hit the first tab SELECT MARKETS,
- change the ‘Market Type’ to ALL STOCKS AND MUTUAL FUNDS,
- type in
and hit the DOWNLOAD button. - This process may take a few minutes.
Solution for all portfolios
- Click LAUNCH UA on your desktop,
- select DATABASE from the main menu,
- click REFRESH (DATABASE) PRICE HISTORY,
- hit the second tab SELECT PORTFOLIO,
- and hit the DOWNLOAD button.
- This process may take a few minutes.
How to get the Fast Studies?
Requirements:
-
- Installation of Unfair Advantage version 2.10.8
- Upgrade to the latest build
How to upgrade to the latest Unfair Advantage build?
- Double click on the downloaded file.
- Click the “Run” button.
- Click the “Next” button.
- Select “I accept the terms in the license agreement” and click the “Next” button.
- Keep the default setting “Anyone who uses this computer” and click the “Next” button.
- Check the default UA folder and click the “Next” button. Change it only if its not the right UA installation drive.THIS STEP IS REQUIRED ONLY IF YOU NEED TO CHANGE THE DRIVE LETTER.
- Check all the current settings and click the “Install” button. Click the “Finish” button.
If you made a mistake during the installation, double click the downloaded file and repeat the steps.
How do I transfer/reinstall Unfair Advantage?
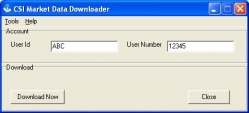
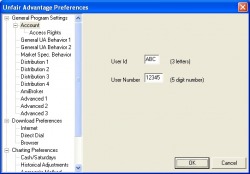
- Write down your User ID and User Number.
(To find your User ID/User Number double click ‘Launch UA’ on your Windows desktop, navigate to ‘Preferences’ along the top, ) - Also backup your PORTFILE.ADM file which is found in your C:\UA\Archives directory, and paste it into a different location such as your desktop.
(This step is only important for custom made portfolios. If you downloaded a vendor portfolio you can skip this step.)Copy the PORTFILE.ADM file to a external drive, or thumb drive for transfer to a new PC.
- Uninstall your previous version.
Make sure to also delete the folder C:\ua (default location) from your local drive.
(This step is very important for a reinstallation of the Software.) - Go to the download page and download UA to the Windows Desktop.
- When done saving, execute or unzip the downloaded file.
- Follow the on-screen directions and launch the program after the installation.
- Type in your permanent User ID and User Number and download to unlock Unfair Advantage.
- Copy your saved PORTFILE.ADM file into your C:\UA\Archives directory.
(Click here for instructions how to move a portfolio.) - Rewrite the Files in the Unfair Advantage.
(Click LAUNCH UA on your desktop | navigate to PORTFOLIO along the top | click SELECT ALL | navigate again to PORTFOLIO | select REWRITE FILE IMMEDIATELY.)
(This process may take several minutes to complete.)
How to manually move the separator in Unfair Advantage?
- Hold the left mouse button, and drag the separator to the left hand side or the right hand side.
- Hold the left mouse button, and drag the separator to the right hand side.
- Hold the left mouse button, and drag the separator to the left hand side.
How to invert a unit in Unfair Advantage?
- Add a symbol to your portfolio, or edit the existing symbol in the portfolio.
- To edit the existing symbol in the portfolio (in this case symbol QF1spot), right click the file and select ‘Edit File Settings’.
- Click the ‘Advanced’ button, and check the ‘Invert’ box. Hit the ‘OK’ button to save the changes.
- You’ll get the inverted data. (In this case we used SEK/USD and inverted to USD/SEK)
How to set up a basic portfolio?
- To create a basic portfolio, click the “Portfolio” menu at the top of your UA screen, and then click “Create new Portfolio”. A screen much like the example below displays.
- The first thing you’ll do is name your new portfolio. Simply type a description or whatever nomenclature you prefer into the “Name” text box. (We used “Portfolio” in the example above). The default location is a directory whose name matches the portfolio name within the C:\UA\Files subdirectory.
- The Selecting Data Series screen appears (this example is for Symbol C2, Cash contract, CSI File Format).
In case you don’t know the symbol or csi number, click the “Markets” button (near to Symbols) to display a list for market selection. - Of special interest will be the Contract Selection tabs (Futures, IFG, Nth Nearest, Back-Adjusted, Gann, Cash, Option), which describe the available contracts.
If you wish to learn more about the different choices, click here. - The File Format is also another important feature. You can export data into ASCII, Excel, CSIM, MetaStock and CSI file format.
If you wish to learn more about the file format, click here. - Click ‘Yes’ to accept to build the hard disk files.
You’ll find the created files (exported files) within the \UA\Files\subdirectory. - You should be able to see your created portfolio, and also the created contract.
- At the bottom of your UA chart is a pair of tabs offering “Chart” and “Table”. The default presentation is of a chart, but you can easily view a numerical table of the data on your screen by clicking the “Table” tab.
- To add more symbols to an existing portfolio first open the “Select Portfolio” drop down menu and choose the portfolio.
- Than click “Add File to Portfolio” in the Portfolio Manager panel, or click the “Add Market” button on the UA toolbar to get to the Selecting Data Series screen (step 3).
- If you need further information about building a portfolio, or adding a symbol to your portfolio please refer to our online manual.
How to change the provider symbol in VantagePoint?
- Find the market in the list.
- Right click on the market name and choose ‘Properties’.
- Click on the ‘Advanced’ tab.
- Click ‘Edit Symbols’.
- Change the symbol and click ‘Save’.
- Click the ‘OK’ button.
- Once all the symbols have been changed close VP and reopen it.
- You should now have the new combined session data.
If you need further assistance, please call Market Technologies’ Technical Support at 813-973-3875